

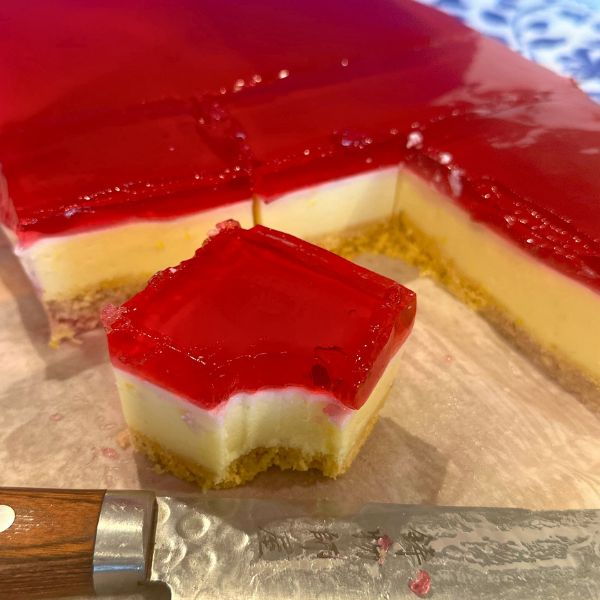
This jelly cheesecake slice is a bit of retro fun, and it always gets a reaction. A crisp biscuit base, a creamy lemon cheesecake middle, and a bright, wobbly jelly top, all set together in the fridge with no baking.
It is easier than it looks. You build it in layers, let the fridge do the setting, and end up with a slice that looks impressive and tastes fresh and creamy. The colour of the jelly makes it a real showstopper on the table.
It is a fun make ahead for parties, and a guaranteed way to wow a crowd.
Why You’ll Love It
It is no-bake, so the fridge does all the work, which makes it easy and great for warm weather. It looks impressive with its bright jelly top but is really just three simple layers, and the lemon in the cheesecake keeps it fresh rather than heavy. It is a fun, retro crowd pleaser and a good make ahead, since it needs setting time anyway.
The Shortcut That Makes It Work
There is no oven at all. A blitzed biscuit base, a creamy cheesecake layer made with cream cheese and condensed milk, and a packet jelly top, each set in the fridge in turn. Condensed milk keeps the middle sweet and creamy without cooking a custard, so the whole thing is really just blitz, mix, layer and chill.
Handy Tips
Let the made-up jelly cool to room temperature before it goes on, if it is too warm it can melt the creamy layer, but do not let it fully set in the bowl either. Make sure the gelatine is properly dissolved into the cheesecake mix so it sets firm. Give each layer time to set in the fridge before adding the next so they stay distinct, and set the whole slice fully before cutting for clean squares.
What To Serve With It
It is a fresh, creamy slice that stands on its own. A few fresh berries on the side are a nice touch if you want to dress it up.
Leftovers / How to Store It
Keep the slice in an airtight container in the fridge for up to 4 days. It is a fridge slice, so serve it chilled straight from the container.
Other Recipes You’ll Love
If you enjoyed this Jelly Cheesecake Slice, here are a few more ideas to add to your rotation:

Jelly Cheesecake Slice

 Prep Time 30 minutes
  Cook Time
1 hour
Cook Time
1 hour  Total Time 1 hour 30 minutes


Ingredients
Equipment
Method
- First, blitz your plain biscuits in a food processor until they’re like fine sand. Mix in the melted butter, then pour it into a lined slice tin and press down firmly. Pop it into the fridge to chill.
- Next, make your jelly following the packet instructions and leave it to cool at room temperature (not in the fridge just yet!).
- In a small bowl, stir together the gelatin (not the 4 tbsp mentioned in the video) and boiling water. If it’s not dissolving, give it a 10-second zap in the microwave.
- Grab your mixer and blend the cream cheese, condensed milk, lemon juice, and zest until smooth. Add the gelatin mixture and give it another whizz.
- Pour this creamy cheesecake mix over the biscuit base, smooth it out, and pop it in the fridge to set for about an hour.
- Once firm, slowly pour the cooled jelly over the cheesecake layer and slide it back into the fridge until the jelly is fully set.
Nutrition
Video
Tried this recipe?
Let us know how it was!
Don’t Forget to Share
Tried my Jelly Cheesecake Slice recipe? I’d love to see how you used it. Snap a pic and tag me on Instagram @steph_cooks_stuff, I love seeing your creations.
FAQs
Do I need to bake this slice?
No. It is completely no-bake. The biscuit base, creamy layer and jelly top all set in the fridge, so it is perfect for warm days.
Why did my jelly melt the creamy layer?
The jelly was likely too warm when it went on. Let it cool to room temperature first, and make sure the creamy layer is fully set before you pour the jelly over.
Can I use a different jelly flavour?
Yes. Any flavour works, so pick one that suits the occasion. It also changes the colour of the top, which is half the fun.
Can I make it ahead?
Yes, and it is a good idea. It needs setting time anyway, so make it the day before and keep it chilled until you serve.








Look yummy
This is the first cheesecake I have ever made. I used lemon and lime juice for extra tang and this combo worked very well.
It was easy to follow the video, although it varied slightly from the written instructions, so I went with the printed version.
Thanks.
Cheers, Rob
Good call Rob. The jelly is made early so it has time to cool while the cheesecake sets. Lemon and lime together sounds great. Cheers Steph
Hi can this be sliced and frozen? Thanks
It can’t Suz. Freezing changes the gelatin structure and it becomes watery when it’s defrosted
Hi Steph
Is it 4 Tbsp or 2Tbsp of gelatine for 1/2 cup boiling water?
Do I also use the juice & zest of the lemon as well?
Hi Mel. It’s 2 tbsp. That was my slip up in the video. I’ve added notes to the ingredients and instructions. Yes, the juice and zest of one large lemon.