

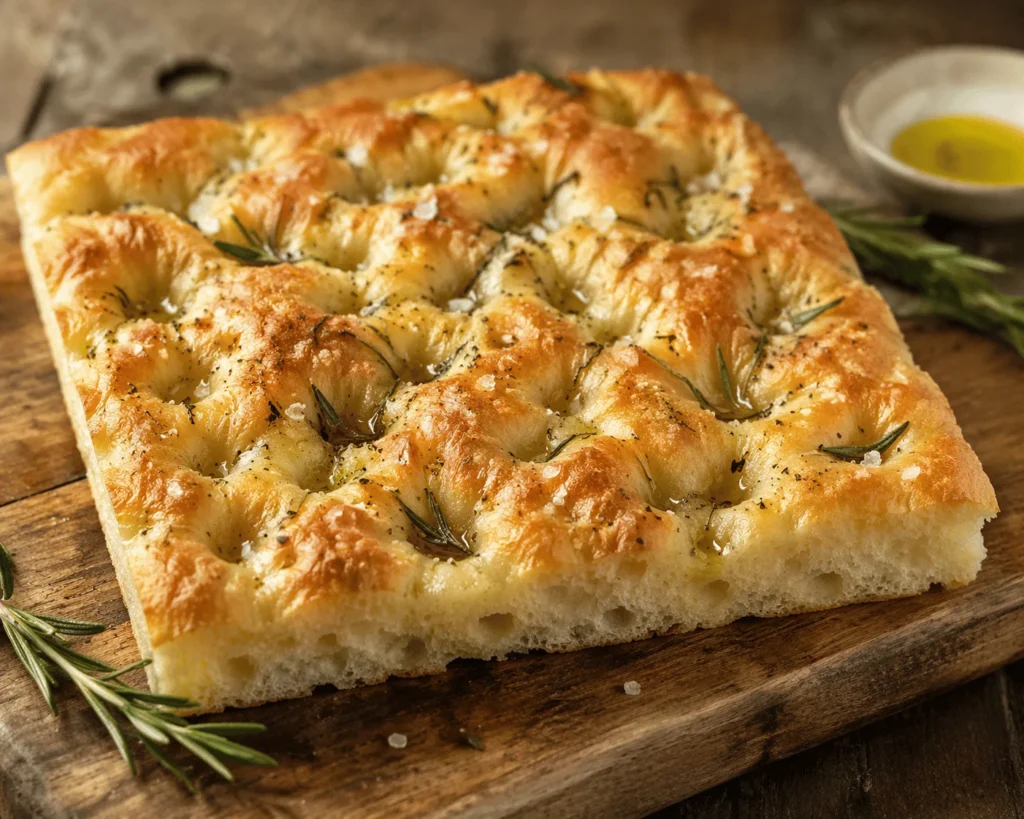
No kneading, no mixer, no stand mixer envy. You put the flour, salt, honey, yeast and hot tap water in a bowl and mix until there’s no dry flour left. That’s the hard part done.
From there it’s mostly waiting. An hour under cling wrap, a fold of the dough with wet hands, then into an oiled tray for a second rise until it spreads out to fill the base.
Then you pour the rest of the oil over, poke your fingers all through it, throw over some flaky salt and bake it for 30 minutes. It comes out golden on top and soft in the middle.
Why You’ll Love It
Bread has a reputation for being a project and this one isn’t. There’s 6 ingredients, no kneading at all, and the only technique is one fold with wet hands. It’s cheap, flour and yeast cost almost nothing, and it makes 12 serves out of one tray. The hot water is what gets the yeast moving quickly, so you’re not waiting overnight for anything. And warm focaccia straight out of the tray is worth the wait on its own, before you’ve even decided what to do with it.
Handy Tips
Get the water temperature right, because it’s the one thing that can sink this. You want hot tap water around 40°C, which you should be able to hold a finger in comfortably. Too hot and it kills the yeast, so if it’s uncomfortable, splash in some cold. Wet your hands before you fold the dough or it’ll stick to you instead of itself. Be properly firm with the dimpling, you want your fingers going right down through the dough rather than just pressing the top. And don’t rush the second rise, the dough needs to spread out and nearly cover the base of the tray before it goes in the oven.
What To Serve With It
It’s very good on its own, warm, torn rather than sliced. Beyond that it goes with anything saucy, so soup, a braise or a bowl of pasta all work. Cut it horizontally and it makes a serious sandwich, and cold leftovers split and toasted are excellent with eggs. A dish of olive oil and balsamic for dipping is the least effort for the best result.
How to Store It
Keep it in an airtight container or wrapped up for up to 3 days. It’s at its best the day it’s made, like most bread, and it firms up as it sits. Warming a piece in the oven or air fryer brings it back much better than the microwave, which makes it chewy.
Other Recipes You’ll Love

NO-KNEAD FOCACCIA

 Prep Time 2 hours
  Cook Time
30 minutes
Cook Time
30 minutes  Total Time 2 hours 30 minutes


Ingredients
Method
- Use hot tap water (around 40°C). Use the finger test to check the water temperature. Cool it with a splash of cold water if it's too hot to hold your finger in.
- Put the flour, salt, honey, yeast, and hot tap water into a large bowl and mix until no dry flour remains.
- Cover the bowl with cling wrap and leave it in a warm spot for 1 hour.
- With wet hands, fold each side of the dough into the middle.
- Pour half the olive oil into a baking tray and transfer the dough into the tray.
- Cover again with cling wrap and leave it in a warm spot until the dough rises and spreads to almost cover the base of the tray.
- Pour over the remaining olive oil and gently dimple the dough with your fingers.
- Sprinkle over flaky salt.
- Bake in a preheated oven at 180°C for about 30 minutes until golden and fluffy.
Nutrition
Video
Tried this recipe?
Let us know how it was!
Don’t Forget to Share
Tried my No-Knead Focaccia recipe? I’d love to see how you used it. Snap a pic and tag me on Instagram @steph_cooks_stuff, I love seeing your creations.
FAQs
Can I use plain flour instead of bread flour?
The recipe is written with plain flour, so that’s already what you want. You don’t need anything special here, which is part of why it’s an easy one to start with.
What if I don’t have honey?
Honey is feeding the yeast and adding a touch of sweetness. Sugar does the same job in a pinch. It’s a small amount either way, so it won’t change how the bread tastes much.
How do I know when the second rise is done?
Go by the look of it rather than the clock. The dough should have risen and spread out until it nearly covers the base of the tray. The recipe doesn’t put a time on this one because it depends on how warm your kitchen is.






I have just made this basic focaccia recipe and the result was amazing. I have added my own toppings, pitted olives and roasted capsicum. It is now in the oven looking and smelling fabulous.
So glad you enjoy it. xx
Hi. What size pan do you use?
Hi Linda, I use the Aldi Crofton non-stick speckled roasting pan. It’s approximately 40 cm x 28 cm (with a 5.5 cm depth). You can use a similar size pan if you don’t have the exact same pan. A similar size lasagne pan will work too. Let me know how it turns out.
I have just made this for the first time and was very impressed. Its delicious.
I do have a couple of questions.
Do I need to mix the yeast with the water and honey before I add it to the Flour?
Is it best to use a wooden spoon for mixing or a mixer with a dough hook?
Hi Rachael, so glad you loved it. No need to mix the yeast separately, just pop everything into the bowl together and mix until there’s no dry flour left. And you don’t need a mixer with a dough hook either, this one’s no-knead, so a wooden spoon or a sturdy spatula does the job just fine. Hope that helps.
Packet yeast? If I have yeast in a container approx hiw much would the equivalent be?
Hi Lerena, thanks for picking that up. It’s 14 grams. The 2 packets are for the box of individual 7 gram sachets you get from the supermarket. I’ve updated the recipe. Let me know how it turns out 🙂
What would the equivalent gluten free ingredients be and if making on cold rainy day what further steps should be taken?
Hi Rebecca.I’d swap the flour for a good quality gluten free bread flour blend, one with xanthan gum already in it holds together best since this dough doesn’t get kneaded. I haven’t tested this specific recipe with gluten free flour myself, so I can’t promise the exact result, but gluten free bakes generally come out a bit denser and less stretchy than the wheat version. On a cold rainy day, your dough will take longer to rise. Find the warmest spot you can, like near a heater, on top of the fridge, or in the oven with just the light on (not the oven itself), and just give it extra time on both rises rather than rushing it. I can’t give you an exact time since I haven’t tested it in cold conditions myself, so just keep an eye on the dough and go by how it looks rather than the clock.
Hello, thanks for the recipe, I can’t wait to try it. Just quick question, how hot should the water be please
Hi Rosemary. Great question. Tap hot water is usually around 40°C, which is spot on for yeast. But some hot water systems run hotter, up to 50°C. Easiest check is the old finger test, dip one in and it should feel like a warm bath, not stingy hot. Too hot to hold your finger in? Let it cool a minute or splash in some cold water first. I’ll add this note to the recipe :).
Hey Steph, that nutritional info , what size serving (like how many grams) are they for? Thanks so much
Thanks for asking Louise, turns out there was a typo, it’s actually 12 serves not 11, fixed that now. Unfortunately I don’t have a gram weight for this one, the system calculates the nutrition per serve rather than by weight.
First attempt at any sort of bread. Turned out delicious. Topped with olives and thyme
Used good quality olive oil definitely making again
First go at bread and you nailed it Louise. Olives and thyme on top sounds absolutely delicious.